Announcement

Collapse
No announcement yet.

The Falklands War diary, 25 years later.

Collapse
X
 
  • Filter
  • Time
  • Show
Clear All
new posts

  • #46
    Week six
    3rd May(mon)
    Departures: HMS Valiant, Courageous, Ambuscade,
    as patrol vessel "Alferez Sobral" searched for the crew of the downed Canberra to the north of the Falklands, she was detected by a 826Sqn Sea King. Fired on, the helicopter called for help and from a range of eight miles, HMS Coventry's Lynx fired two of the new Sea Skua missiles, followed shortly by two more from HMS Glasgow's Lynx. Badly damaged and with eight crew dead, the "Sobral" was escorted into Puerto Deseado two days later, but the Canberra's crew was never found.
    9 Harrier GR3 arrive in ascension after 9 hour flight from RAF Wittering.
    Argentine patrol ship Alferez Sobral damaged 70 miles north of East Falkland island
    Argentine aircraft lost near Stanley - Aermacchi MB-339A crashed in bad weather near the airfield killing the pilot

    4th May(tues)
    Departures: Alvega, Eburna
    Black Buck 2. A second raid on Stanley Airfield, however none of the bombs impacted the Runway on this occasion.

    destroyer "Sheffield" was hit by an air-launched Exocet SHEFFIELD hit at 52°45'S, 57°25'W.By late Tuesday morning (4th) the CVBG was 70 miles to the south east of Stanley. Aware of the Exocet threat, frigates "Brilliant" and "Broadsword" with their point defence Sea Wolf stayed in close to the carriers. Near them was a screen of three RFA's, further out a second one of "Glamorgan" and three more frigates, and then twenty miles ahead, the three type 42's including "Sheffield" with their high altitude Sea Darts. Finally towards the Falklands, Sea Harriers of No.801 flew CAP and at this time investigated a number of possible air contacts. efore then a CANA Neptune had picked up the ships by radar and two Super Etendards of 2 Esc took off from Rio Grande each armed with an Exocet AM.39. Refuelled by a Grupo 1 Hercules, they flew in at low altitude, popped-up for a radar check and released the missiles from 20 to 30 miles. One of the Exocet may just have missed "Yarmouth", but the other slammed with hardly any warning into "Sheffield" soon after 11.00 am. Hitting amidships, the warhead did not explode, but the impact and unused fuel started uncontrollable fires. Badly damaged and with little power, frigate "Arrow" soon came alongside to assist and "Yarmouth" stood by. Captain Salt's crew fought gallantly to save their ship, but with 20 men dead, the order to abandon was given that afternoon. With the wounded already on board "Hermes", "Arrow" took off most of the 260 survivors and "Sheffield" drifted for four days until "Yarmouth" was ordered to pull her clear of the TEZ.The survivors later returned to Ascension on tanker "British Esk".
    Argentine aircraft lost near Stanley - PNA Skyvan at the airfield was badly damaged in another bombardment by HMS Glamorgan, HMS Alacrity and HMS Arrow.
    British Aircraft lost at Goose Green: Sea Harrier. Three 800Sqn Sea Harriers from "Hermes" attacked Goose Green airstrip with CBU's and retard bombs. Little damage was done, but one aircraft was hit by Skyguard-directed 35mm Oerlikon fire and crashed killing the pilot
    Most of the TF.79 ships were returning to port by Tuesday and "25° de Mayo" disembarked her aircraft. Although submarine "San Luis" stayed out a few more days, the rest of the Navy kept well clear of the British nuclear subs. However to the south of the Falklands a number of ships joined in the search for "Belgrano's" survivors with most of them returning on Wednesday.


    5th May(wed)
    HMS Intrepid and Atlantic Conveyer arrive in ascension. Conveyer takes on board 6 GR3 and 8 sea Harrier


    6th May(thurs)
    Canberra and Elk Departed Ascension with 40 and 42 Cdo RM and 3 Para, with Sea King HC4s deployed aboard.
    British aircraft lost at 53°S, 57°W - Sea Harriers. Two 801Sqn Sea Harriers on CAP were sent to check a radar contact and just disappeared without trace after presumably colliding in the poor visibility

    7th May(fri)

    Arriving in Ascension: Europic Ferry, Norland(with 2 Para). Departed same day with amphibous Group.
    TEZ - extended to within 12 miles of Argentine coast

    8th May(sat)
    Departures: Saxonia
    With the Task Force back on the offensive, frigate "Alacrity" bombarded the Stanley area as "Brilliant" and her Lynx entered the north end of Falkland Sound to intercept any supply ships. Meanwhile "Coventry" and "Broadsword" had moved closer to Stanley with the unenviable job of tempting out Argentine aircraft.

    9th May(sun)
    Departures: Baltic Ferry, Nordic Ferry(with 5 Brigade)
    RFA "Blue Rover" to Cumberland Bay to take up her duties as station tanker.
    Argentine intelligence trawler Narwhal damaged 60 miles SE of Stanley and later sank.Two 800Sqn aircraft left "Hermes" to bomb Stanley. Stopped by cloud cover, they detected intelligence trawler "Narwal" on the way back and were given permission to attack by control ship "Coventry". Strafing failed to stop her and the high-altitude fuzed bombs were dropped, one of which hit without exploding. With the trawler at a standstill, 820Sqn and 846Sqn Sea Kings flew an SBS party some 150 miles to capture her, but before arriving, two more 800sqn Sea Harriers attacked and further damaged "NARWAL" with cannon fire. The SBS boarding went ahead, but next day she sank in tow with one crewman dead.
    Argentine aircraft lost off South Jason Island - Skyhawks.HMS Coventry fired three Sea Darts at distant aircraft, including a Hercules on a supply run to Stanley, and apparently missed. However around this time, two Grupo 4 Skyhawks were lost. They may have been hit by the Sea Darts or alternatively crashed in low visibility on their way to attack the two ships. Whatever the case, one of them was later found on South Jason Island. Then in the afternoon, as an Army Puma headed out over Choiseul Sound to search for "Narwal", another Sea Dart fired at extreme range brought her down with the loss of all on board
    Last edited by Goldie fish; 14 May 2007, 00:24.


    Catch-22 says they have a right to do anything we can't stop them from doing.

    Comment


    • #47
      Damn I've seen one of those 'tank ' things before..wonder where?
      Covid 19 is not over ....it's still very real..Hand Hygiene, Social Distancing and Masks.. keep safe

      Comment


      • #48
        "See you on the beach"

        On the 13th of May, this day 25 years ago….

        Brigadier Julian Thompson stood up to address his commando, battalion and other unit commanders at a formal Orders Group. Thompson was commander of 3 Royal Marine Commando Brigade, but for this mission his brigade had been substantially augmented by the addition of 2 and 3 Para and many other specialist units, including two troops of the Blues and Royals. There were sixty officers from the Navy, Army and Marines present in the wardroom of the 12,000 ton LPD HMS Fearless, at sea about 900 miles from Port Stanley. The plans for an amphibious assault ‘to repossess’ the Falklands had been discussed with commanders prior to this meeting, but the formal order to carry out the assault had only been received from Fleet Headqaurters at Northwood the previous day.

        Initial presentations at the O Group covered the latest intelligence about the Argentinians and a summary of British Naval and Naval Air Forces that would support the assault. Thompson then set out the mission, which was “to conduct a silent night landing by landing craft so that by first light the Brigade would have secured the high ground overlooking Port San Carlos, San Carlos Settlement and Ajax Bay…. In phase one 40 Commando and 45 Commando were to land simultaneously… In phase two, 2 Para and 3 Para were to land…. Phase three, starting at first light, was to see the first use of helicopters to move the Rapiers (SAMs) and guns (105mm) ashore…” (from ‘No Picnic’, by Juian Thompson)


        Detailed staff presentations followed, covering everything from the Naval Gunfire Support plan to the complex logistics involved. The date and time of the landing would follow by signal later. Thompson spoke again briefly to conclude the meeting, and then said he would take any questions. There were none. The COs headed to Fearless’s flight deck and the helicopters that would take them back to their various ships. “See you on the beach”.

        Comment


        • #49
          Week seven
          10th May(mon)
          HMS Sheffield sunk at 53°S, 57°W
          Departures: HMS Bristol(Type 82), RFA Olna, HMS Active, Avenger(Type 21), HMS Andromeda, Minerva, Penelope(Leander), RFA Endagine(With 4 Wessex Helis
          HMS Alacrity enters Falkland Sound from the south.As submarine "San Luis" made her last reported and equally unsuccessful attack on ships of the Task Force and "Sheffield" finally sank, "Glasgow" (Sea Dart) and "Brilliant" (Sea Wolf) took over as type 42/22 combination from "Coventry" and "Broadsword" and continued their radar picket and bombardment duties off Stanley. That night as "Arrow" moved to the north end of Falkland Sound, sister ship "Alacrity" prepared to sail right through from the south for the first time to flush out any supply ships. As she passed up the Sound, "Alacrity" detected a small ship apparently heading for Port Howard, and using her single 4.5 inch, illuminated with star shell. Refusing to stop, the target was engaged in the only surface action of the war and after a number of hits, exploded and sank with heavy casualties. Reportedly there were only two survivors from what turned out to be the naval transport "ISLA DE LOS ESTADOS" carrying fuel and military supplies. "Alacrity" carried on through to meet "Arrow", and on Tuesday morning, both ships headed back to the carriers. Later that day, "Yarmouth" also returned from her attempts to tow "Sheffield" out of the TEZ.

          11th May(tues)
          Departures: Lycaon,
          Arriving in Falklands theater: Hospital Ships Uganda,
          HMS Alacrity sinks Isla de los Estadosoff Swan Island.
          A raid was mounted by D Sqdn SAS on the airstrip and facilities at Pebble Island,especially to destroy the ground attack Pucaras based there. First of all men of the Squadron's Boat Troop were put ashore over The night to reconnoitre the area

          12th May(wed)
          Departures: HMS Cardiff(Type 42), Queen Elizabeth 2(with 5 brigade)
          Arrivals(Ascension):RFA Tidespring (with POWs from South Georgia), HMS Antelope,
          HMS Glasgow damaged off Stanley.
          Argentine Aircraft lost: Skykawksoff Stanley, Skyhawks at Goose Green.
          With "Glasgow" and "Brilliant" still off Stanley, eight A-4B Skyhawks of Grupo 5 were sent in to attack the bombarding ships. The first flight came in low, and as "Brilliant" fired her Sea Wolf automatically for the first time in anger, two aircraft exploded in the air, a third crashed in to the sea trying to escape and the fourth dropped its bomb without hitting, and got away [a16, a17, a18]. The second flight of four came in some minutes later, but for technical reasons Sea Wolf could not fire, and this time "Glasgow" was hit by a bomb which went in one side and out the other without exploding or causing any casualties. Although the damage was not severe, she had to withdraw to the CVBG for repairs that took a number of days and eventually became the first British warship to return home. Meanwhile as these Skyhawks returned home, they passed too close to Goose Green and "Glasgow's" attacker was shot down by Argentine AA
          British Aircraft lost east of Falklands: Sea King.
          Although bad weather had restricted fixed wing flying earlier in the week, by Wednesday 12th it had improved sufficiently for high level bombing attacks to be made on Stanley, the same day a No.826 ASW Sea King from "Hermes" ditched near the CVBG with engine failure [b7]. The crew were saved.

          13th May(thurs)
          Arriving in Falklands Theater: RFA Regent,HMS Valiant,

          14th may(fri)
          Departures: HMS Exeter(to replace Sheffield), Atlantic Causeway(with 20 Wessex from 847Sqn and 8 Sea Kings from 825sqn),RFA Fort Grange.
          Arrivals in Falklands Theater: HMS Hecla.
          To TRALA(Tug, Repair and Logistic Area ) Salvageman, Stena Seaspread


          "Hermes" and escort "Broadsword" together with "Glamorgan" in the fire support role left the CVBG, and passing to the north, approached Pebble Island by night. As "Glamorgan" closed in to gunfire range, "Hermes" flew off the 48 SAS attackers and NGFO team in her No.846 Sea Kings to be guided in at midnight by the awaiting patrol.

          15th May(sat)
          RFA Tidespring(With 2 Replacement Wessex), HMS Antelope depart Ascension.
          in a record-breaking flight of 19 hours and 8,300 miles, an RAF Nimrod crewed by 201 Sqdn reconnoitred the Argentine coast for any warships that might threaten the approaching Task Force,
          After a forced march to the airstrip, the attack went ahead led by Captain Hamilton, and all the aircraft there put out of action or destroyed by prepared charges. A fuel depot, ammo dump and radar installation were also destroyed. All this time "Glamorgan" provided gunfire support, and as the raiders withdrew, a brief Argentine counter-attack was halted when the officer in charge was shot. With two men slightly wounded the SAS were safely picked up again by the helicopters. The raid was a complete success and the Argentines not only lost six Pucaras of Grupo 3 [a20-25], four T-34C Mentors [a26-29] of CANA 4 Esc and one Coast Guard Skyvan [a30], but also the use of the airstrip at a crucial time. Now into Saturday morning, the warships returned to the CVBG, but "Glamorgan" soon moved on to other duties.
          Argentinian Aircraft lost at Pebble Island: Pucaras, Mentors, Skyvan.


          On Saturday night "Brilliant's" Lynx failed in an attack on the transport "Bahia Buen Suceso" in Fox Bay East, but "Hermes" aircraft more than made up for this next day.

          16th May(sun)
          Departures:Wimpey Seahorse, Balder London.
          Arrivals back in UK: RFA Brambleleaf(for repairs),British Tamar(to Gibraltar) to reload.
          3 Cdo Brigade Join LSL Group.
          Black Buck 3 Cancelled.
          Argentine Cargo ship Rio Carcarana attached and beached at Port King.In the middle of Sunday 16th, two No.800 Sea Harriers bombed and strafed the blockade running cargo ship "Rio Carcarana" (8,500 grt) at anchor off Port King and although there were no casualties, she caught fire, was beached and abandoned, finally to be destroyed by "Antelope's" Lynx a week later. Another two aircraft caught the "Bahia Buen Suceso" still at Fox Bay East alongside the jetty and raked her with cannon fire. Bombs were not used because of the ship's proximity to the settlement, but the damage was enough to deny her use by the Argentines, and she stayed there until after the war.
          Following the Pebble Island raid, HMS Glamorgan took on the job of convincing the Argentines that any landings would take place on East Falkland, south of the capital. For a number of nights, she bombarded Stanley and moved down the coast as far as Choiseul Sound carrying out a variety of deception activities. Other SBS and SAS operations were no doubt taking place all this time, and over Sunday night "Alacrity" sailed through Falkland Sound again and landed an SBS/NGFO team by Gemini near Sussex Mountains which overlooks the landing beaches around San Carlos Water.
          Argentinian Transport Bahia Buen Suceso damaged at Fox Bay East.


          Catch-22 says they have a right to do anything we can't stop them from doing.

          Comment


          • #50
            Great Reading, All These Posts! Well Done To All.

            Comment


            • #51
              http://www.guardian.co.uk/falklands25years

              Comment


              • #52
                Week 8
                17th May (monday)
                HMS Invincible, HMS Brilliant approach Argentine coast and Land Special forces. Sea King destroyed near Punta Arenas.
                One of the strangest incidents of the war now took place involving Chile. The only certainty was that during the week the Chilean authorities found a burnt out Sea King HC.4 of No.846 NAS near the southern town of Punta Arenas, the crew of three gave themselves up and were returned to the UK to later receive gallantry awards for a number of hazardous missions. Presumably, and as announced by the Ministry of Defence, these included losing their way, ending up 500 miles from the Task Force and destroying their helicopter!! One possibility was that after a high speed dash to the west over Monday night (17th) by "Invincible" and escort "Brilliant", the Sea King landed special forces near air bases in Southern Argentina either to report on aircraft as they left to attack the Task Force or even in an attempt to destroy the Super Etendards (subsequently confirmed in the 1990's).

                Whatever happened, the carrier obviously could not risk waiting for the helicopter to return and by Tuesday morning (18th) was back with the CVBG. The Sea King therefore made its way to neutral territory to be destroyed by the crew sometime over Tuesday night [b9]. Any men landed might then have been picked up later by submarine. As it happened, the diesel-engined and more manoeuvrable "Onyx" arrived in the Falkland's area by the end of the month and was reported to have lifted off special forces from near Rio Grande, and in doing so to have damaged herself on an uncharted rock. She also went on to land SBS teams around the Falklands to supplement the helicopter drops.

                Sea King Lost east of Falklands,Late that night to the east of the Falklands while on ASW patrol she hit the sea with altimeter trouble and had to be abandoned, but again fortunately with no casualties.

                18th May (tuesday)
                Sea King Crew picked up by Chile
                Next day when within range, and through into Wednesday, "Atlantic Conveyor" flew off four of the embarked No.809 Sea Harriers to "Invincible" and the remaining four with the six RAF GR.3's to "Hermes". The 25 Sea Harriers would now concentrate on air defence and the RAF GR.3's on ground attack, but with a total of 31 now embarked, the carrier maintenance teams were sorely stretched and yet still provided a remarkably high level of availability.

                19th May (wed)
                Sea King lost north east of Falklands,loaded with SAS crashed into the sea and 21 out of the 30 men on board died [b10]. At the time a sea bird strike was thought to have brought her down, but this cause is now open to doubt. The dead included 18 men of D and G Sqdn SAS, some of them so soon after their Pebble Island triumph, one member of the Royal Signals, the only RAF casualty of the war and the aircrewman, Corporal M D Love RM who was awarded a posthumous DSM for his special forces missions.
                orders were received from Northwood to spread "Canberra's" major units around the other ships to avoid heavy loss of life in the event of her being hit. Through Wednesday 19th and in surprisingly calm weather for the South Atlantic in autumn, the larger landing craft (LCU's) carried by the assault ships transferred 40 Cdo RM to "Fearless", and Z Coy 45 Cdo and 3 Para to "Intrepid". The whole of 42 Cdo stayed on "Canberra", the rest of 45 Cdo on RFA "Stromness" and 2 Para on "Norland".

                Norland at San Carlos.

                20th May (Thurs)
                3 Commando Brigade approach san Carlos:
                HMS Fearless, HMS Intrepid, Canberra, Europic Ferry, Norland, RFA Fort Austin,RFA Stromness,RFA Sir Galahad, RFA Sir Geraint, RFA Sir Lancelot, RFA Sir Percivale, RFA Sir Tristram,HMS Brilliant, HMS Broadsword, HMS Argonaut, HMS Plymouth, HMS Yarmouth, HMS Antrim, HMS Ardent.
                Carrier Battle Group remaining East of Islands: HMS Hermes, HMS Invincible, HMS Glamorgan, HMS Coventry, HMS Glasgow, HMS Alacrity, HMS Arrow, RFA Omelda, RFA Regent, RFA Resource, RFA Tidepool, Atlantic Conveyer, Elk.
                As the Amphibious Group sailed in towards Falkland Sound, diversionary raids were mounted starting on Thursday night. Of immediate concern was a half company of infantrymen on the 800 feet high Fanning Head overlooking the entrance to San Carlos Water. To deal with these, "Antrim" went ahead with two Wessex, some 25 SBS heavily armed with machine guns, and a naval gunfire observer. The force landed by helicopter to the east of the Argentine positions under covering fire from "Antrim", and the defenders called on to surrender. This they refused to do and the engagement continued with a number of them killed or captured. Others escaped, but Fanning Head was finally under British control and the vulnerable landing craft below saved from attack. Further south, any attempt by the Darwin garrison to move towards the beachhead was blocked by the small force of D Sqdn SAS under the command of Major Delves and supported by "Ardent" out in Grantham Sound. Landed by No.846 Sea Kings to the north, the attackers engaged the Argentines with machine guns, anti-tank missiles and mortars to such an extent they were reported to be in battalion strength.
                Only two days after arriving, three of the RAF Harrier GR.3's started their ground attacks by hitting a fuel dump at Fox Bay East with CBU's.
                Last edited by Goldie fish; 4 June 2007, 16:17.


                Catch-22 says they have a right to do anything we can't stop them from doing.

                Comment


                • #53
                  21st May (fri)
                  With the main body of the Amphibious Group anchored just outside San Carlos Water, the final plan was for 2 Para and 40 Cdo to land at San Carlos first so the Paras could move south to prevent the Argentines at Darwin from occupying the Sussex Mountains. Then 45 Cdo would go ashore at Ajax Bay and 3 Para at Port San Carlos to complete the encirclement of the anchorage. With 42 Cdo remaining on "Canberra" in reserve, Rapier missiles and artillery, ammo, fuel, rations and other stores would then be landed by the few helicopters, landing craft and Mexeflotes. The landing craft carrying the first wave were due to beach at San Carlos at 2.30 am.

                  Unfortunately delays built up both in reaching the anchorage and in loading the troops, but eventually they headed in below Fanning Head before turning south towards San Carlos led in by Major Southby-Tailyour RM. The landing craft from "Fearless" including the smaller LCVP's carried 40 Cdo, with two of the LCU's carrying a Scorpion and Scimitar each in the bows (four light tanks in total) ready to provide gunfire support. With them in "Intrepid's" four LCU's was 2 Para from "Norland". "Plymouth" accompanied them in as close escort. Then 3,800 miles from Ascension, the first major British landing since Suez took place around an hour late, but completely unopposed. As soon as 2 Para landed, they moved off the five miles to Sussex Mountains, and 40 Cdo dug in below the western ridge of The Verde Mountains. As dawn broke, the landing craft returned to the ships still outside San Carlos Water to pick up the second wave - most of 45 Cdo from "Stromness" with Z Coy from "Intrepid", and all of 3 Para from "Intrepid". Now in daylight, the Marines went ashore near the disused meat packing plant at Ajax Bay on the western side, and the Paras a mile west of Port San Carlos on the northern side. Before 3 Para could secure the settlement, 3 Cdo Bde suffered its only fatal casualties on D-day.

                  With the three beachheads being secured, the twelve amphibious ships entered San Carlos Water in broad daylight - "Canberra" and some of the larger ones anchoring in the deeper water to the north, and the smaller LSL's nearer San Carlos. The escorts patrolled nearby in Falkland Sound and took the brunt of the air attacks that followed. Using especially the No.846 Sea Kings, the first priority was to get the T Bty Rapiers ashore, although it took a number of hours to set up the twelve firing posts around the perimeter ready to join in the air defence. Early in this operation, shortly before 9 am, one of the Sea Kings flew east of Port San Carlos and within gunfire range of the small Argentine garrison as it withdrew east. It escaped, but the escorting Gazelle of C Flt 3CBAS was hit and crashed near the shore, the pilot mortally wounded. Only minutes later a second C Flt Gazelle shared the same fate, going down on a nearby hillside, and this time both crewmen were killed .
                  Along with the other tanks of The Blues and Royals, the three 105mm batteries of 29 Cdo Regt RA and the single battery of 4 Field Regt RA also landed. During this time the air attacks started, threatening the amphibious ships and their stores, and so every effort was made to unload as much as possible, especially ammo so the merchantmen could leave that night. From "Canberra", reserve 42 Cdo went ashore at Port San Carlos to support 3 Para if any threat there developed, and one of the two Surgical Support Teams landed at Ajax Bay to set up a Field Dressing Station under the command of Surgeon Cmdr R T Jolly (awarded OBE) RN, and in the same vicinity as the Brigade Maintenance Area. Because of the air raids, Brigadier Thompson was not flown ashore until late afternoon but immediately started visiting his unit commanders.

                  After G Sqdn SAS reported Argentine helicopters dispersing at night from Stanley, a number were caught on the ground near Mount Kent and a Chinook and Puma destroyed by 30mm cannon fire . Later that morning, two more aircraft left "Hermes" but one had to return with undercarriage problems. The lone Harrier carried on and during a photo-reconaissance run over Port Howard was hit by ground-fire and crashed. The pilot, Flt Lt Glover ejected and was taken prisoner of war.
                  The first reaction to the landings was by Falklands-based aircraft. Grupo 3 Pucaras took off from Goose Green as "Ardent" shelled the airstrip, and one was shot down over Sussex Mountains by a Stinger SAM fired by D Sqdn SAS pulling back from the Darwin raid . Then a single Aermacchi MB-339A of CANA 1 Esc from Stanley made a cannon and rocket attack on "Argonaut" at 10 am causing minor damage and some casualties. Thereafter, mainland-based sorties that day led to heavy losses on both sides with five of the ships on the defending gunline lost or hit by bombs or cannon fire, and only "Plymouth" and "Yarmouth" escaping damage. One more Pucara and nine Daggers and Skyhawks were lost to the Sea Harriers on CAP and one to a SAM fired by warships. The fierce AA fire from ship and shore made the Argentine aircraft come in low and fast, and although many of their bombs were on target, they failed to explode. Fortunately, they also failed to hit the transports. The main raids took place around 10.30 am, 1.00 pm and 3.00 pm.

                  First to arrive were a total of eight Daggers of Grupo 6. Attacking the northern end of the gunline, "Broadsword" was hit by cannon fire and "Antrim" also badly damaged by a UXB with casualties on both ships, but no one killed. One of the Daggers was brought down probably by a Sea Wolf from "Broadsword". "Antrim" then moved towards San Carlos Water where the bomb was removed, before heading that night for the CVBG. Shortly after midday, the Sea Harriers on CAP had their first success of the day. Two Grupo 3 Pucaras from Goose Green attacked a nearby naval gunfire observer directing "Ardent's" fire from out in Grantham Sound, three No.801 aircraft closed in, and shot one of them down with cannon fire

                  With 3 out of four attacking aircraft having to return with fuelling problems the fourth carried on north up Falkland Sound and near-missed "Ardent" with two bombs. At "Brilliant's" command, two No.800 Sea Harriers chased the returning aircraft without success, but instead spotted the next four incoming Skyhawks from Grupo 4 over Chartres in West Falkland. They tried to escape, but two went down to Sidewinders near Christmas Harbour. Then the afternoon sorties followed, starting at 2.30 pm with six Skyhawks of Grupo 5 which nearly put paid to "Argonaut". Deluged by near misses, two bombs hit without exploding but two men were killed in the Sea Cat magazine. Steaming at high speed and with engine and steering controls damaged, she was anchored by the action of Sub Lt Morgan, but had to stay in the area for a week until the UXB's were removed and the damage temporarily repaired.
                  Next, twelve Daggers of Grupo 6 were due to arrive. Out of the first group of six from Rio Grande, two aborted and as the remaining four came in over West Falkland, "Brilliant" vectored two No.800 NAS Sea Harriers and one of the Daggers was shot down near Teal River Inlet by yet another Sidewinder missile. The three surviving aircraft pressed on and caught "Ardent" still in Grantham Sound. Coming in from astern they blanketed her with hits and near-misses destroying her Lynx and Sea Cat installation and killing a number of men. With only small arms fire left for defence, she headed for the protection of the other escorts off San Carlos Water. As these three Daggers got away, six more from San Julian arrived in two flights of three. The first hit "Brilliant" with cannon fire causing slight damage and some casualties before they safely headed back, but the second flight was wiped out before even reaching the target area. Picked up over West Falkland by "Brilliant" again, two No.801 Sea Harriers shot them down with Sidewinders to the north of Port Howard .

                  The last attacks started some 30 minutes later by two flights of A-4Q Skyhawks of 3 Esc in the only Navy sorties to reach the Falklands that day. The first three aircraft caught poor "ARDENT" off North West Island and again from the stern, bracketed her with hits and near misses. Badly damaged, on fire aft and flooding, with 22 men killed and some 30 injured, Cmdr West ordered abandon ship and "Yarmouth" came alongside to pick up the survivors. "Ardent" finally sank the following evening. One of the CANA Skyhawks was damaged by the return small arms fire, and all three were caught by two No.800 Sea Harriers near Swan Island. One was shot down by Sidewinder , cannon fire destroyed a second and hit the already damaged third. Unable to land at Stanley with undercarriage problems, the pilot of this one ejected . The second CANA flight ran in fifteen minutes later, but failed to hit any of the ships. The Sea Harriers continued to fly CAP, but there were no more raids that day and the transports continued unloading.


                  Ardent Lists following severe damage from Argentine Aircraft attack.

                  At the end of this long and violent day, and with "Canberra" now carrying "Ardent's" survivors, the merchantmen although only partly unloaded and still carrying much of the infantry unit stores, left for the safety of the CVBG. Other amphibious ships and most of the escorts remained. Commodore Clapp and Brigadier Thompson had successfully secured a beachhead on the Falklands - 3 Cdo Bde was ashore with their Rapiers and artillery together with some ammo, a start had been made on bringing a major part of the combat stores ashore, and the Marines and Paras were digging in and actively patrolling.


                  Catch-22 says they have a right to do anything we can't stop them from doing.

                  Comment


                  • #54
                    22nd May (sat)
                    Argentine patrol craft Rio Iguaza damaged and grounded in Choiseul Sound.patrol craft "Rio Iguaza" left Stanley with Pucara spares and 105mm guns for Goose Green, and next morning was found and strafed in Choiseul Sound by two No.800 Sea Harriers on CAP. She ran ashore, but two of the guns were recovered and reached their destination

                    the two assault ships, five LSL's, and RFA's "Fort Austin" and "Stromness" were still in San Carlos Water. Of the original escorts, only "Brilliant", "Plymouth", "Yarmouth" and the damaged "Argonaut" remained in direct support, and "Broadsword" spent some of the time north of Pebble Island with "Coventry" as a missile trap for incoming aircraft. "Antrim" had gone, but "Ardent's" place was taken by newly arrived "Antelope", although sadly not for long. Next day, they were joined by LSL "Sir Bedivere" and frigate "Arrow" which had structural damage but could still share in the air defence. Of the merchantmen that left on Friday, "Norland" was back in to disembark her remaining troops and later take on board "Antelope's" survivors, and "Canberra" out in the holding area transferred stores to RFA "Resource" for delivery on Monday.
                    At the northern end of the beachhead, 3 Para patrolled to the west and north of Port San Carlos, while 42 Cdo followed up the retreating Argentine troops, but only as far as Cerro Montevideo to stay within artillery range. To the west, 45 Cdo was dug in above Ajax Bay and on the east, 40 Cdo above San Carlos and destined to spend a frustrating war mainly defending the area. In the south, 2 Para on Sussex Mountains was about to be the first unit to prepare for action. While waiting for more supplies to be unloaded and for General Moore to arrive, Brigadier Thompson at his mobile HQ at San Carlos made plans to push forward. Apart from the special forces patrols scattered about the Falklands, Marines of the Mountain and Arctic Warfare Cadre had been flown to Bull Hill and Evelyn Hill on the way to Stanley. He also decided to launch a battalion raid against the enemy forces at Goose Green

                    23rd May (sun)
                    Captured Falklands coaster Monsunen driven aground in Lively Sound. "Brilliant" and "Yarmouth" searched for the captured coaster "Monsunen" known to be heading for Stanley from Darwin, and early on Sunday, "Brilliant's" Lynx located her off the east coast. A small SBS boarding party tried to capture the ship by helicopter, but gunfire drove them away. The frigates then ran "Monsunen" aground in Lively Sound, but next day she was towed into Darwin by "Forrest".
                    Damaged Argentine cargo ship Rio Carcarana destroyed in Port King."Yarmouth" returned to San Carlos Water, but "Brilliant" headed for the carriers. Finally the damaged cargo ship "RIO CARCARANA" was finished off in Port King at midday by Sea Skuas fired by "Antelope's" Lynx.

                    Argentine aircraft lost near Shag Cove House - Pumas, Agusta A-109A:three Army Pumas carrying ammo and stores for Port Howard, and escorted by an Agusta, were on the last leg of their dangerous flight from Stanley when they were sighted near Shag Cove House by two No.800 Sea Harriers. One Puma flew into the ground trying to escape , the crew getting clear before it exploded, and cannon fire destroyed the Agusta and disabled a second Puma. Two No.801 Sea Harriers shortly arrived and finished off this one by strafing . Just one Puma survived to fly the three crews to Port Howard.
                    ANTELOPE hit by UXB's in San Carlos Water; Argentine aircraft lost - Skyhawk:FAA also started using Grupo 1 Learjets as pathfinders and decoys. First to arrive in the early afternoon were four A-4B Skyhawks of Grupo 5 which found "ANTELOPE" in San Carlos Water. In a confused action which put two UXB's in her and killed one man, an attacker clipped her mast and another was shot down by possibly a Sea Wolf from "Broadsword" or a Rapier . That evening as the bombs were being defused, one exploded killing Sgt Prescott RE. Catching fire, she blew up and sank next day with a broken back.

                    HMS Antelope erupts with flame as a UXB detonated while attempts were being made to defuse it.
                    Argentine aircraft lost over Pebble Island - Dagger:Minutes after the Grupo 5 attack, three Skyhawks of CANA 3 Esc came in but failed to hit any ships, and one crashed on landing back at Rio Grande. Two hours later, two incoming Grupo 6 Daggers were sighted by two No.800 Sea Harriers, and as they tried to escape, one was destroyed over Pebble Island by Sidewinder
                    British aircraft lost 90 miles north east of Stanley - Sea Harrier:As four No.800 aircraft took off from "Hermes" to bomb Stanley airfield, one hit the sea and exploded killing Lt Cmdr Batt
                    Brig Gen Thompson ordered Lt Col Jones to prepare 2 Para to launch a battalion raid against the enemy forces at Goose Green. On the same day, 42 Cdo was ordered back from its exposed position to join in the defence of Port San Carlos, and just to the north, 3 Para suffered wounded casualties when two patrols accidentally clashed.


                    Catch-22 says they have a right to do anything we can't stop them from doing.

                    Comment


                    • #55
                      Week 9
                      24th May (mon)
                      Argentine aircraft lost just north of Pebble Island - Daggers
                      LSL's Sir Galahad and Sir Lancelot damaged in San Carlos Water
                      Argentine aircraft lost in King George Bay, West Falkland - Skyhawk
                      That morning, four Grupo 6 Daggers came in low over Pebble Island, but under "Broadsword's" direction, two No.800 Sea Harriers brought three of them down with Sidewinders. As this happened, more Daggers and Grupo 4 and 5 Skyhawks reached the anchorage from the south. LSL's "Sir Galahad" and "Sir Lancelot" each received a UXB and "Sir Bedivere" was slightly damaged by a glancing hit, all believed to be from Skyhawks of Grupo 4. The three aircraft in this flight were damaged by the fierce AA, including claims by both "Fearless" and "Argonaut" Sea Cats, and on the way home, one crashed into King George Bay off West Falkland [a53]. Some of the crew of both LSL's were evacuated, but the bombs were later defused, although "Sir Lancelot" was not fully operational again for a long time.


                      25th May (tue)Argentinian National Day
                      Argentine aircraft lost just north of Pebble Island - Skyhawk
                      Argentine aircraft lost over San Carlos Water - Skyhawk
                      Argentine aircraft lost north east of Pebble Island - Skyhawk
                      Broadsword damaged, COVENTRY sunk and Lynx helicopter lost 10 miles north of Pebble Island
                      ATLANTIC CONVEYOR sunk 90 miles north east of Stanley; aircraft lost - Wessex, Chinooks, Lynx
                      Tuesday the 25th May was Argentine National Day, and one of the worst days in the History of the Royal Navy in the post War years. and the first target for Grupo 5 Skyhawks that morning was the two missile trap ships, but "Coventry's" Sea Dart brought one of them down at long range north of Pebble Island and the sortie was abandoned. Then at midday four Grupo 4 aircraft reached San Carlos Water. One was blasted out of the sky by small arms fire and missiles (the claims included "Yarmouth's" Sea Cat), although the pilot ejected safely, and as the three survivors escaped, a second aircraft was destroyed to the north east of Pebble Island by another Sea Dart from "Coventry". In the afternoon, the tables were turned, first of all by four Skyhawks of Grupo 5 which reached "Coventry" and "Broadsword". As the first pair approached, the CAP Sea Harriers were warned off, but "Broadsword's" Sea Wolf system broke contact and she was hit by a bomb which bounced up through her stern and out again badly damaging the Lynx on the way. The second pair now went for "Coventry", and just as "Broadsword" prepared to fire Sea Wolf again, the type 42 got in the way and contact was broken for a second time. With little to stop them, the Skyhawks put three bombs into "Coventry" at 3.20 pm. Within half an hour she had capsized and been abandoned with 19 men killed and 25 wounded. The survivors were picked up by "Broadsword" and helicopters from San Carlos and she shortly sank with her Lynx. Of the three type 42's that first sailed south, two were now at the bottom and the third damaged and soon to return.
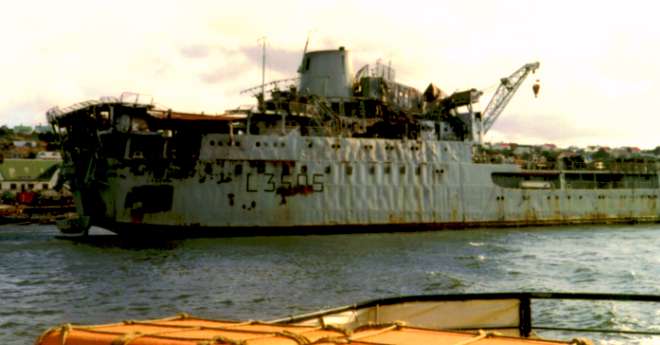
                      As "Coventry" went down,Twelve minutes after she capsized and quite separate from the Skyhawk sorties, two Super Etendards of CANA 2 Esc approached the CVBG from the north after refuelling on the way by Hercules tanker. In their path and close together were the two carriers and transport "Atlantic Conveyor" at this time some 90 miles north east of Stanley and heading in for San Carlos Water. Just after 4.30 pm, they launched two Exocets from a range of 30 miles, and in spite of attempts to decoy the missiles away by chaff fired by the warships including "Ambuscade", one of them hit "Atlantic Conveyor" and set her ablaze uncontrollably. The Atlantic Conveyer attempted to provide the smallest possible target for the missile by swinging its stern into its path, and place the heavy stern ramp as a shield, but had not completed its turn when the missile struck.The Missile hit the stern and travelled forward deep into the ships hold. Little is known of the fate of the second Exocet. "Alacrity" and "Brilliant" closed in to help, but the order was soon given to abandon ship, and by the time the survivors were picked up, a total of twelve men had died including Capt North. Fortunately the Harriers had been flown off before the attack, but all the helicopters apart from an airborne Chinook and thousands of tons of stores including ammunition, Harrier spares and tents, had to be left on the burning ship. Tug "Irishman" went to her aid and on Thursday took the burnt out hulk in tow, but "Atlantic Conveyor" soon sank taking with her six Wessex, three Chinooks and a spare Lynx .
                      Some speculation suggest that the Etendards mistook the radar signature of Atlantic Conveyer for one of the Fleets Aircraft carriers. In any event one of the factors that contributed to her demise following the Exocet attack was the timber decking placed to protect her car decks had become saturated with oil from various vehicles. Before long the Fires within the hold were out of control, and were setting off the Paveway bombs stored for use by Harriers.. HMS Alacrity stood in close to haul away the liferafts, which were in danger of being damaged by the intense fire.
                      The Consequences of the loss of the Aircraft and stores that were aboard meant that the future Battle plans, and how the troops would get around, would have to be changed dramatically. 12 men died aboard Conveyor including 3 navy and 3 RFA, 19 on HMS Coventry.


                      Atlantic Conveyor Before and after the attack.

                      26th May (wed)
                      2 Para moved from Sussex Mountains half way to Camilla Creek House on their way to Darwin
                      L Coy 42 Cdo helicoptered from Port San Carlos to Sussex Mountains
                      With "Atlantic Conveyor's" loss, and with four Sea Kings already used for night missions and one for Rapier support, Brigadier Thompson had only six more plus five Wessex to move his troops towards Stanley. When his staff met on Wednesday morning, and with new orders from Northwood, fresh plans were made. Goose Green was to be taken and held by 2 Para, and much of the rest of the Brigade would have to walk! Late that day, Lt Col Jones led 2 Para south on the path to Darwin, and on Thursday, 45 Cdo and 3 Para started their move overland to Teal Inlet while 42 Cdo waited a later move to Mount Kent. Still on Wednesday, L Coy 42 Cdo flew from Port San Carlos to Sussex Mountains to relieve 2 Para.
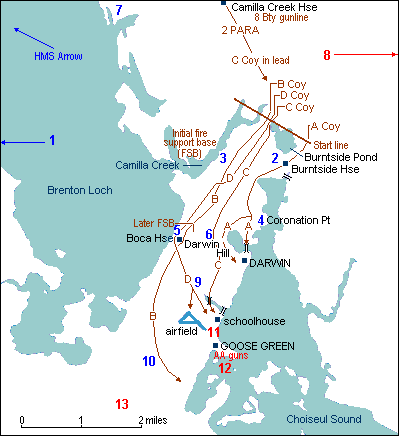
                      as some 500 men of 2 Para moved south towards Darwin, there was much uncertainty about Argentine strength in the area. However by the time of the surrender, and after allowance is made for the nearly 50 killed (not the originally reported 250), there were over 1,000 POW's including the 12th Inf Regt and a Coy from the 25th. With their approaches mined, the infantry were in well-prepared defensive positions, especially between Boca House and Darwin half way down the isthmus, and for support could call on 105mm artillery, AA guns later in the ground defence role, and attack aircraft from Stanley.

                      27th May (thurs)
                      By early Thursday morning, 2 Para had marched the eight miles from Sussex Mountains and reached the holding position at Camilla Creek House where most lay up all day. Two patrols from C Coy probed forward towards either side of the isthmus to plot some of the enemy defences, but later pulled back under fire. And then early that afternoon, two Harrier GR.3's attacked Argentine positions with CBU's, and in a subsequent strafing run, one of them was hit probably by 35mm Oerlikon fire and crashed to the west of Goose Green . Sqdn Ldr Iveson ejected and hid up before being rescued three days later.
                      That night, the three 105's of 8 Bty RA and their ammo were flown to Camilla Creek House by No.846 Sea Kings, and "Arrow" headed into Grantham Sound, opening fire from there under the control of a naval gunfire observer. A later turret fault was repaired and she remained on station supporting the Paras advance towards Darwin, when with the threat of air attack at dawn, had to return to San Carlos Water. Meanwhile that same evening, 2 Para moved off the two miles to the start line with C (Patrol) Coy leading the way. With D Coy at first in reserve, A and B Coy's waited on either side of Burntside Pond, the mortars to their rear, and the fire support company with its Milans initially across Camilla Creek from the forward Argentine positions. Early on Friday the 28th, the men of 2 Para prepared for a night attack against largely unknown forces across the open ground of the Goose Green area, five miles long and over a mile wide.
                      Starting on the morning of Thursday 27th, Lt Col Whitehead's 45 Cdo first moved by LCU from Ajax Bay to Port San Carlos before setting out the 12 miles to New House, reaching there late that night.
                      Although there were few Argentine aircraft attacks between now and the second week in June, they nevertheless chose Thursday afternoon for their first strike against land targets, when two pairs of Grupo 5 Skyhawks bombed and strafed troop and supply positions. Coming in over the Brigade Maintenance Area at Ajax Bay, one pair killed six men of 45 Cdo and the Cdo Logistics Regt, wounded others and landed UXB's near the Field Dressing Station. This is where Flt Lt Swan later slept beside the bombs to reassure the staff and patients. The second pair hit San Carlos and killed one man each from 40 Cdo and the 59 Ind Cdo Sqdn RE; but during the attacks, one of the Skyhawks was hit by 40mm Bofor fire from "Fearless" or "Intrepid" and crashed over West Falkland near Port Howard .


                      Catch-22 says they have a right to do anything we can't stop them from doing.

                      Comment


                      • #56

                        1. 2 Para, 8 Bty RA approach to and battle for Goose Green (26th-28th)
                        2. 45 Cdo moved from Port San Carlos, first to New House (27th)
                        3. 45 Cdo reached Douglas (28th) and dug in (29th)
                        4. 3 Para in two columns moved from Port San Carlos towards Teal Inlet (28th) and stayed there over Saturday (29th)
                        5. 45 Cdo moved on to Teal Inlet (30th)
                        6. 3 Para moved on ahead from Teal Inlet to Lower Malo House (30th) on their way to Mount Estancia
                        7. J Coy 42 Cdo helicoptered from Port San Carlos to Darwin (28th)
                        8. L Coy 42 Cdo at Port San Carlos
                        9. 40 Cdo in defence of San Carlos area
                        10. D Sqdn SAS helicoptered to Mt Kent (28th)

                        28th May (Fri)
                        At 3.30 am, A Coy moved off on the left and attacked Burntside House believed to be occupied by an Argentine platoon, but found no-one there other than four unhurt civilians. At 4.10 am, B Coy started forward from the other side of Burntside Pond down the right flank with D Coy following them long the middle. With artillery support on both sides, B and D Coy's were soon in confused action against a series of enemy trenches, and as they slowly made progress, A Coy moved past unoccupied positions at Coronation Point. Leaving one platoon of A Coy to provide covering fire from the north side of Darwin, the remainder started to circle round the inlet to take the settlement. As dawn broke, the attacks on both flanks bogged down as B Coy came up against the strongpoint of Boca House and A Coy found that a small rise, later known as Darwin Hill, was the key to the Argentine defences.

                        Not until midday did 2 Para break through. As A Coy was hit and went to ground, Lt Col Jones and his Tac HQ came up, and another attempt to push forward was made which led to two officers and an NCO being killed. Col Jones moved off virtually on his own, and was soon shot and dying in an action which led to the award of a Victoria Cross. Maj Keeble was called up from the rear, and leaving A Coy to slowly wrest Darwin Hill and pulling B Coy slightly back from Boca House, ordered D Coy to move round them on the far right along the edge of the sea. Now in daylight, the battle continued with the Argentines helicoptering in their first reinforcements and flying more support missions. The first attack by Falkland's based aircraft took place earlier when a Grupo 3 Pucara was hit, probably by a Blowpipe SAM, but limped back to Stanley. The next sortie by two more Pucaras caught two Royal Marine Scouts on their way in to casevac Lt Col Jones. Capt Niblett managed to evade them, but Lt Nunn was killed by cannon fire and went down near Camilla Creek House . One of the Pucaras was later found to have crashed into high ground returning to Stanley.
                        By midday, A Coy had taken and held Darwin Hill, and B and D Coy's had finally silenced Boca House. Still under fire, D and C Coy's headed towards the airfield and Goose Green while B Coy circled east to cut off the settlement. During the attack towards the schoolhouse, three men of D Coy were killed in an incident involving a white flag. Now into the late afternoon, aircraft from both sides came on the scene, starting with two MB.339's of CANA 1 Esc and two Pucaras of Grupo 3 which hit the school area. One of the Navy jets was brought down by a Royal Marine Blowpipe, and minutes later one of the Pucaras dropped napalm and the other shot down by small arms fire. Then three Harrier GR.3's brought much needed relief by hitting the AA guns at Goose Green with CBU's and rockets.
                        With evening approaching and the Argentines squeezed in towards Goose Green, more reinforcements arrived to the south by helicopter, while to the north, J Coy 42 Cdo was flown in reinforce 2 Para but too late to join in the fighting. Major Keeble sent two prisoners into the settlement with a note saying quite simply surrender or take the consequences. The negotiations lasted all night, but the promise of more Harrier strikes and a firepower demonstration in the morning underlined the hopelessness of their situation. They had plenty of men and ammunition, but were effectively trapped by the surrounding British troops, with no room to manoeuvre. The options were surrender, or a bloody and pointless battle with civilians in their midst.
                        Lt Col Pike and 3 Para were to follow behind 45 Commando on their way to San Carlos, but instead took a more southerly, direct route in two columns. After marching for 24 hours they met up on Friday a few miles short of Teal Inlet, and when darkness fell, completed the journey late that night.
                        with J Coy 42 Cdo flying down towards Darwin, the rest of 42 Commando prepared for the Mount Kent operation. K Coy was already at Port San Carlos, and was joined from Sussex Mountains by L Coy, after they in turn had been relieved by B Coy of 40 Cdo which had to stay in defence of the beachhead. That same night, D Sqdn SAS finally completed its helicopter move below Mount Kent, but an attempt to follow them up with 42 Cdo Tac HQ, K Coy and three 105's of 7 Bty over Saturday night was stopped by blizzards. Late on Sunday, No.846 Sea Kings and the lone RAF Chinook managed to get in, but in the middle of an SAS fire-fight with Argentine troops, after which K Coy moved on to the summit. The Chinook was slightly damaged on the flight back, but support helicopter strength was increasing. The first No.825 Sea Kings flew ashore from "Atlantic Causeway" on Saturday and joined the other Navy, Marine and Army helicopters as well as the Chinook already flying from the Forward Operating Bases (FOB's) scattered around San Carlos Water.


                        29th May (sat)
                        The Argentine commanders, Air Commodore Pedroza and Lieutenant Colonel Piaggi decided to surrender and paraded their men accordingly, meeting with Major Keeble at 0930 hrs. The morning brought its own surprise for the Argentines as they surrendered their weapons, when they saw how few men they were surrendering to.
                        1,500 prisoners were taken in the battle for Goose Green, and forty-five Argentine personnel died. Fifteen men from 2 Para, one from the Royal Engineers and a Royal Marine pilot were killed in the fighting, and 37 Paras were wounded. None of the civilians were hurt. The battle for Goose Green was not only the largest battle in terms of the numbers of men involved directly in the fighting, but also in the sheer geographical area the Paras were expected to recapture. Many observers have commented that at the time they were not expected to win the engagement, even Colonel H Jones gave the operation only a seventy-five percent chance of succeeding.
                        As the Sea Harriers continued to fly CAP and drop bombs on Stanley airfield and the GR.3's fly ground support from the carriers, a total of three were lost over these few days. Apart from the GR.3 near Goose Green on Thursday, next to go on Saturday afternoon (29th) was a Sea Harrier of No.801 NAS which slid of "Invincible's" deck as she turned into wind in heavy weather, although fortunately the pilot ejected and was rescued from the water.


                        30th May (Sun)
                        at midday on Sunday, the RAF found itself down to just three GR.3's. One of four aircraft over the Stanley area was hit by small arms fire from Argentine troops, and on the way back to "Hermes" ran out of fuel. Sqdn Ldr Pook parachuted into the sea and was soon rescued by a No.826 Sea King.
                        45 Cdo pushed on to join 3 Para at Teal Inlet, but 3 Para and the light tanks were ordered to head for Mount Estancia as part of the plan to occupy the heights to the west of Stanley, and by the end of the day had reached Lower Malo House. 45 Cdo stayed put for now.
                        On Sunday morning an Argentine Army Puma was lost near Mount Kent, possibly to its own forces [a62]. And that afternoon, two A-4C Skyhawks were brought down in the first coordinated CANA/FAA mission. The plan was for two Super Etendards to launch the last airborne Exocet at the Task Force carriers, and for four Grupo 4 Skyhawks to finish off the target with bombs. Coming in from the south after tanker refuelling, the aircraft mistakenly released the missile from 20 miles at "Avenger", then east of the Falklands. The Exocet was apparently deflected by chaff, and although the Etendards escaped, two of the Skyhawks were destroyed by Sea Darts from "Exeter" as they went in to attack, although "Avenger's" 4.5 inch may have hit one of them.

                        HMS Avenger today(PNS Tippu Sultan)
                        Attached Files
                        Last edited by Goldie fish; 5 June 2007, 22:48.


                        Catch-22 says they have a right to do anything we can't stop them from doing.

                        Comment


                        • #57
                          Week 10
                          31st May (mon)
                          M & AW Cadre attacked Top Malo House.
                          small M & AW Cadre force helicoptered in to attack an Argentine patrol at Top Malo House, and killed or captured all 17 in exchange for three marines wounded.
                          42 Cdo K Coy on summit of Mt Kent
                          42 Cdo L Coy helicoptered from Port San Carlos to Mount Challenger.Over Monday night, L Coy (and the rest of 7 Bty RA) flew in from Port San Carlos, and marched to Mount Challenger
                          Black Buck 5 Shrike Anti Radar Vulcan raid on Stanley.The TPS-43 surveillance radar was only slightly damaged.

                          3 Para secured Estancia House (31st), then dug in around Mount Estancia securing Estancia House on Monday, and next day
                          To complete 3 Cdo's move, Brigade HQ and the supplies needed converged on Teal Inlet. On Monday, the HQ staff flew in, followed by their Bandwagon snow vehicles and escorting tanks of 3 Troop, although these continued on to join 4 Troop at Estancia House before both moved down to Bluff Cove. To open up Teal as the forward base, "Intrepid" arrived over Monday night with an LCU going in with the first supplies and accompanied by two LCVP's fitted with light minesweeping gear.

                          1st June (tues)
                          3 Para digging in on and around Mount Estancia, before being joined by the six guns of 79 Bty RA.
                          Argentine aircraft lost north of Pebble Island - Hercules.Late that morning, a Grupo 1 Hercules on a reconnaissance mission was detected by frigate HMS Minerva in San Carlos Water, and a vectored No.801 Sea Harrier brought it down 50 miles north of Pebble Island using Sidewinder and cannon fire. Then in the afternoon, the last Sea Harrier was lost when another No.801 aircraft on a sortie over Stanley was hit by a Roland SAM. Flt Lt Mortimer bailed out into the sea just to the south, but it was nine hours before he was found and rescued by a No.820 Sea King.

                          HMS Minerva

                          LSL "Sir Percivale" and other LSL's started a delivery service from San Carlos Water.
                          Welcome reinforcements, especially 5th Inf Bde now started arriving. The first transports reached San Carlos Water on Tuesday morning and "Norland" landed the Gurkhas by LCU, "Baltic Ferry" her Scouts, and "Atlantic Causeway" the remaining No.825 Sea Kings and some of the No.847 Wessex. That same day, frigate "Penelope" picked up 2 Para's new CO after he parachuted into the sea from an extended range Hercules, and "Canberra" reached the CVBG.

                          2nd June (wed)
                          42 Cdo J Coy from Goose Green .over Wednesday night, J Coy moved to Mount Challenger direct from Goose Green.
                          3 Para had completed its tab;
                          Canberra offloaded the two Guards battalions on Wednesday morning again using the hard-worked LCU's plus her two No.825 Sea Kings.
                          Now 5th Inf started its push forward when elements of B Coy 2 Para flew to Swan Inlet House in five Army Scouts and Major Crosland made his famous 'phone call to find that Fitzroy and Bluff Cove were clear of the enemy. Later that day and the next, 2 Para was helicoptered the 35 miles from Goose Green to occupy the two settlements.
                          the first step was taken in extending Harrier operations when the Royal Engineers completed a Forward Operating Base at Port San Carlos, with two No.800 Sea Harriers arriving on Saturday.

                          Westland Scout of the Army Air Corps Being refuelled in the Falklands.

                          3rd June (thurs)
                          1/7 Gurkhas helicoptered from San Carlos to Goose Green
                          2 Para helicoptered from Goose Green to Fitzroy and Bluff Cove
                          Black Buck 6 Shrike Anti Radar Vulcan raid on Stanley. Destroyed a Skyguard AA radar, but on the return flight the bomber had to divert to Rio de Janeiro with refuelling difficulties, but was released a week later.

                          "Nordic Ferry" arrived with the rest of the Gazelles, while "Canberra" left for the TRALA for the remaining days of the war. Once they had landed, most of the 1/7th Gurkhas flew in the lone Chinook to Goose Green to relieve 2 Para, and to spend the next week patrolling into Lafonia.

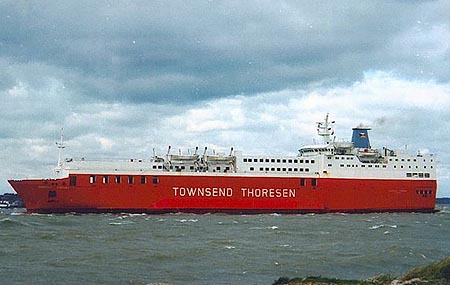
                          Nordic Ferry as she appeared during the Falklands Conflict.

                          4th June (fri)
                          45 Cdo RM finished its yomp from Teal Inlet and reached a position below Mount Kent from where it could reinforce 3 Para or 42 Cdo in their exposed positions within range of the Argentine guns.

                          5th June (sat)
                          2nd Scots Guards by assault ship Intrepid from San Carlos Water to Lively Island, and on to Bluff Cove by four LCUs.With 2 Para so far forward, and lacking helicopter lift, General Moore decided to risk the assault ships on night runs from San Carlos Water with the two Guards units. Starting on Saturday night, "Intrepid" carried the 2nd Scots around the south of Lafonia and off Lively Island, transferred them to her four LCU's. After a lengthy and rough passage they arrived at Bluff Cove early on Sunday to stay, while the three coys of 2 Para already there were ferried to Fitzroy by the same LCU's to join the rest of the battalion. That night it was the turn of "Fearless" to bring round the 1st Welsh. Reaching Lively Island, only her two LCU's were available to carry HQ and 2 Coy on to Bluff Cove. The rest had to return to San Carlos Water to try again Monday night. Before then a plan to improve communications links was thwarted. Early on Sunday morning as an AAC Gazelle flew forward with two Royal Signals to set up a relay station, it was accidentally shot down near Pleasant Peak by a Sea Dart fired by HMS Cardiff, and all four on board killed

                          6th June (sun)
                          HQ & 2 Coy 1st Welsh Guards by assault ship Fearless from San Carlos Water also to Lively Island, and on to Bluff Cove by two LCUs
                          British AAC aircraft lost near Pleasant Peak - Gazelle


                          Catch-22 says they have a right to do anything we can't stop them from doing.

                          Comment


                          • #58
                            Week 11
                            7th June (mon)
                            Rest of Welsh Guards had to return in Fearless to San Carlos Water.
                            Argentine aircraft lost: On Monday morning, a reconnaissance Learjet of FAA Grupo 1 was shot down over Pebble Island by one of "Exeter's" Sea Darts
                            The decision was now taken to use the LSL's to continue 5th Infantry's move forward. "Sir Tristram" reached Fitzroy on Monday 7th to start unloading ammo
                            Leaving C Coy to garrison Goose Green, the Gurkhas moved towards Stanley. On Monday 7th, D Coy sailed around to the Fitzroy/Bluff Cove area in the Falkland's coaster "Monsunen" now back in British hands after being taken over by the Royal Navy at Darwin. Over the next two days, the rest of the battalion helicoptered in, and then moved to an area south of Mount Challenger in reserve, in time for the 3 Cdo Bde assaults.

                            8th June (tues)
                            In San Carlos Water, "Sir Galahad" took on board the rest of the 1st Welsh from "Fearless" before sailing around Lafonia to arrive on Tuesday morning.
                            By now, only one LCU and a Mexeflote were left to complete offloading "Sir Tristram", and although by early afternoon, Rapier SAM's and 16 Field Ambulance had gone ashore from "Sir Galahad", plans to move the Guards to Bluff Cove to join the rest of the battalion had come to nothing. Worse still, the LSL's had been reported by enemy observers, and around 2.00 pm, five Skyhawk's of Grupo 5 and five Daggers of Grupo 6 were coming in over the Falklands.

                            First to be attacked by the Daggers, but in Falkland Sound was frigate "Plymouth" on her way to bombard an Argentine position on West Falkland. Hit by cannon fire and four UXB's, one of which detonated a depth charge, she was only slightly damaged.
                            Shortly after, the Skyhawks reached Fitzroy. Three of them put two or more bombs into the crowded "SIR GALAHAD", and the other two hit "Sir Tristram" with two UXB's killing two crewmen. The ships caught fire and were soon abandoned, but by then the results for "Sir Galahad" were catastrophic with a total of 48 killed - five RFA crewmen, 32 Welsh Guards and eleven other Army personnel, with many more badly burned and wounded. "Sir Tristram" was later returned to the UK for repairs, but the burnt-out "Sir Galahad" was scuttled at sea as a war grave on the 25th June.

                            Sir Tristram following the attack.
                            As the FAA's last major effort continued, four Grupo 4 Skyhawks attacked troops in the Fitzroy area later that afternoon, and minutes after, four Skyhawks of Grupo 5 arrived over Choiseul Sound to catch LCU F4 (belonging to "Fearless") sailing from Goose Green to Fitzroy with 5th Infantry HQ vehicles. Hit by one bomb, which killed the coxswain, Colour Sgt Johnston (post QGM) and five of the crew, she shortly sank. Two No.800 Sea Harriers over head on CAP immediately dived to the attack and brought down three of the Skyhawks with Sidewinders

                            Argentine aircraft lost - Skyhawks
                            British aircraft lost at Port San Carlos - Harrier GR.3:Next day, the last two RAF Harrier GR.3's from Ascension arrived on "Hermes", and earlier, the fourth and last GR.3 lost was damaged beyond repair landing heavily at the Port San Carlos FOB with a partial engine failure

                            9th June (wed)
                            On Wednesday, RFA "Engadine" flew off her four Wessex HU.5's of No.847 NAS to San Carlos Water to add to the helicopter lift

                            10th June (thurs)
                            on West Falkland, as the SAS kept a careful watch on the two large Argentine garrisons there, an observation post near Port Howard was surrounded on Thursday 10th and Capt Hamilton killed as he tried to fight his way out.
                            Last edited by Goldie fish; 16 June 2007, 02:07.


                            Catch-22 says they have a right to do anything we can't stop them from doing.

                            Comment


                            • #59
                              11th June (fri)
                              The supporting warships shelled Argentine positions in the mountains, and near Stanley, a house in the capital was hit killing two women and mortally wounding a third in the first and last civilian deaths of the war.
                              Two members of D Coy were decorated for their reconnaissance patrols as well as guiding in B Coy on the night of the attack. This took place on Friday 11th, after 3 Para moved from Murrell Bridge to the attack start line.
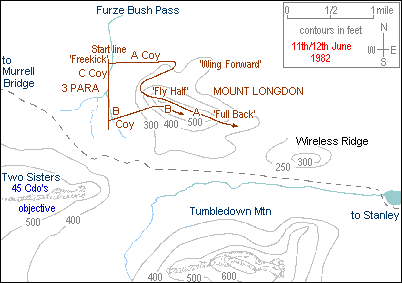
                              With minefields to the south, the Argentines on Wireless Ridge to the east, and given the long and narrow summit ridge of Mount Longdon, Lt Col Pike decided to launch a silent attack from the west. With C Coy in reserve and fire support teams staying on the start line, the plan was for B Coy to take the length of the summit ('Fly Half' and 'Full Back') while A Coy occupied the northern spur ('Wing Forward') as a fire support base for the B Coy attack. Once Mount Longdon was secured, A and C Coys would, if possible, move on to Wireless Ridge. After a short delay, A and B Coys started off from 'Freekick' at 8.15 pm
                              Battle for Mount Longdon - As B Coy (4, 5 and 6 Platoons) approached Mount Longdon in the dark, on the left, one of 4 Platoon's men stepped on a mine and the alerted Argentines opened fire at the start of a battle that stretched through to dawn, ten hours later. On the right, 6 Platoon got on to the western summit with little fighting, but a by-passed bunker fired into them as they pushed through 'Fly Half', and later, when pinned down, they suffered a number of men killed by mainly sniper fire. Meanwhile 4 and 5 Platoons, using anti-armour weapons against enemy bunkers, fought their way on to the western end, but as they attempted to move to the east came under heavy automatic fire. 4 Platoon's commander was wounded, platoon Sgt McKay took over, and collecting some of his men and Cpl Bailey moved in to knock out a heavy machine gun post. In an action which led to the posthumous award of the Victoria Cross, Sgt McKay and one of the men were killed, but the enemy position was silenced. Now a second heavy machine gun held up B Coy HQ and 5 Platoon. Sgt Fuller was put in charge of 4 Platoon and with support from 5, tried to knock out this one, but without success. Maj Argue now pulled back both 4 and 5 Platoons, and called down artillery and naval gunfire on the enemy positions, after which a left flanking attack was put in, making some progress. Before long, they and the rest of B Coy found themselves under fire again, and having taken such heavy casualties, Lt Col Pike brought B Coy to a halt half way along the Longdon summit ridge.

                              Coy (1, 2 and 3 Platoons) had meanwhile moved from 'Freekick' towards 'Wing Forward', but taken losses from the fire of the Argentine positions on the eastern end of the summit which were now holding up B Coy. With little hope of making progress, A Coy was pulled back to the western end of Longdon, moved through B Coy, and with artillery and GPMG support, 1 and 2 Platoons worked their way along the eastern half of the summit clearing the enemy positions with rifle and bayonet and grenades. Now the Argentines started withdrawing, and as soon as 'Full Back' was secured, 3 Platoon moved down the slope facing Wireless Ridge. As dawn broke, and with no possibility of exploiting forward, 3 Para started digging in on Mount Longdon to spend the next two days under heavy and accurate artillery fire.

                              Eighteen Paras and an attached Royal Engineer had been killed in the attack with many more wounded, and three more Paras and a REME craftsman were killed in the subsequent shelling.

                              On Friday 11th, 45 Cdo less X Coy left their positions behind Mount Kent and moving around the north side, reached the main start line ('Pub Garden') as planned. Meanwhile X Coy, marching down between Mount's Kent and Challenger and heavily weighed down, especially by the Milans, arrived at the start line over two hours late. After a short rest, they began their move towards 'Long Toenail' at 11.00 pm.
                              Battle for Two Sisters - X Coy headed across the open ground towards 'Long Toenail' led by 1 Troop, and less than a mile short of the peak, 3 Troop took over the lead, but half way up was stopped by heavy machine gun fire and temporarily pulled back. The enemy positions were hit by Milans and some mortar fire, and now 2 Troop pushed on to the summit under artillery fire. Reaching there, they were forced back by more shellfire, but shortly returned driving off the Argentine machine gunners. Soon after midnight as X Coy continued its fight for 'Long Toenail', Z Coy followed by Y Coy to their right, moved off from 'Pub Garden' on their silent uphill approach. As the Argentines were still distracted by X Coy's attack, the other two companies went to ground until a flare near Z Coy led to the right hand 8 Troop opening fire. The return enemy fire including artillery and mortars was so heavy, killing four men, that Lt Dytor led his men of 8 Troop forward in a charge towards the summit, followed by 7 Troop in a firefight that still left them short of their objective.

                              On their right, Y Coy swung further right to come up alongside them, managing to knock out some of the machine guns holding up Z Coy. 8 Troop was then able to advance towards the top covered by 7 Troop, and went on to clear the enemy positions on the southern side of their objective, while 7 Troop went on to do the same on the northern side. Two and a half hours after crossing the start line, Z Coy had taken the western part of 'Summer Days'. During this time, 9 Troop stayed back in reserve after suffering casualties from the mortars and artillery. Y Coy now moved between the Two Sisters peaks and below Z Coy's 8 Troop, and headed for the eastern part of the north east summit under heavy fire. Pushing on, and again using anti-armour weapons against enemy positions, all of Two Sisters was in 45 Cdo's hands before dawn. As they reorganized and dug in, heavy Argentine shelling started. Lt Col Whitehead prepared to move ahead towards Tumbledown Mountain, but was stopped by Brigadier Thompson. 45 Cdo had now taken one of the main Argentine defenses for the loss of the three Marines and a Sapper of the Royal Engineers killed by shellfire and mortars.

                              Battle for Mount Harriet: Unlike the other two attacks, this one was 'noisy' with Mount Harriet receiving a preliminary bombardment as part of the diversion plan.On Friday 11th, as 42 Cdo prepared to move off, Argentine shellfire killed one of the Marines on Wall Mountain. Later, K and L Coys started off from Mount Challenger, with one of J Coy's Troops going ahead to mark the route and drop off Milan sections, including one on the Stanley track in case any of the Argentine Panhard armoured cars should appear. They were also due to meet up with a Welsh Guards patrol assigned to secure 42 Cdo's start line. But there was a delay and H-hour held up, although J Coy went ahead and opened fire from Wall Mountain to simulate a large scale clash.
                              - K Coy crossed the start line at 10.00 pm, and almost reached the Argentine positions without being spotted. On the left, 1 Troop engaged the first enemy, and 2 Troop to the right went ahead to start clearing their part of K Coy's objective during which time 42 Cdo suffered its only fatal casualty of the night. 3 Troop now passed through 2 Troop on to the summit, and with 1 Troop below them to the south, started to work their way westwards bunker-by-bunker, but were held up by machine gun fire. It was at this time that three K Coy Corporals - Newland of 1 Troop and Eccles and Ward of 3 Troop - won the Military Medal for taking the enemy position.

                              While K Coy was fighting on the eastern end of the summit and coming under artillery fire, L Coy was making its way up towards the western end of Mount Harriet under heavy machine gun fire which opened up soon after they crossed the start line. Milans were successful in knocking out these and other enemy sniper positions, but it took a number of hours and casualties from artillery, before L Coy's half of the summit was taken, still in the dark. 5 Troop was then sent forward to the next objective just to the north of the summit, but was initially held up until the enemy resistance crumbled under mortar and artillery fire.

                              With dawn and L Coy still fighting forward, K Coy was ordered on to Goat Ridge, by which time J Coy had moved directly across from Wall Mountain to join in the final securing of Mount Harriet, running through a minefield on the way. In successfully taking its objective, 42 Cdo had lost just one man killed.
                              Last edited by Goldie fish; 15 June 2007, 23:21.


                              Catch-22 says they have a right to do anything we can't stop them from doing.

                              Comment


                              • #60
                                12th June (sat)
                                3 Para on Mount Longdon


                                45 Cdo on Two Sisters


                                42 Cdo on Mount Harriet


                                Glamorgan damaged and helicopter Wessex destroyed 17 miles south west of Stanley.As destroyer "Glamorgan" retired out to sea after 45 Cdo's attack, a land-launched Exocet fired from Stanley hit her in the hangar area, badly damaging that part of the ship, killing thirteen men and destroying her Wessex

                                HMS Glamorgan after the attack, showing the severely damaged hangar.

                                Black Buck 7tanley airfield was bombed by a Vulcan for the final time.


                                13th June (sun)
                                Battle for Wireless Ridge - After 2 Para had finished marching that Sunday evening (13th) from Furze Bush Pass, supporting fire was opened on 'Rough Diamond' at 9.15 pm, and 30 minutes later, D Coy crossed its start line backed up by the fire of four Scimitars and Scorpions.


                                D Coy reached 'Rough Diamond' to find the Argentines had withdrawn under the attacking fire, leaving behind a few dead. As the Paras consolidated in the new position, it was their turn to come under defensive fire from the Argentine 155's. Now from behind them to the east, A and B Coys crossed their start line, but one man was killed by enemy shellfire. Then as the two companies approached 'Apple Pie', the enemy broke and withdrew under the weight of British artillery, mortars and GPMG's, although they themselves were heavily shelled for the rest of the night. With 2 Para moving ahead so quickly, Lt Col Chaundler gave C Coy the go ahead to occupy ring contour 100, which it did without opposition.
                                From 'Rough Diamond', D Coy moved to the western end of Wireless Ridge and prepared to advance through its length, as the light tanks and supporting Milans and GPMG's joined A and B Coys on 'Apple Pie' pouring in fire from the left flank. D Coy took the first half of the ridge without trouble, but the Argentines resisted fiercely over the second half, often fighting from bunker to bunker. They eventually broke, and all of Wireless Ridge was in D Coy's hands, although not before one man had been killed by British artillery and another by Argentine small arms. As the men of 2 Para dug in and came under more defensive fire, the Argentines were heard regrouping in the dark in the vicinity of Moody Brook.

                                With dawn, a small group of Argentines counter-attacked D Coy, but were soon driven off with the help of mortars and the Royal Artillery's 105's, by which time 2 Para had taken the whole feature at a cost of three men killed, considerably aided by the fire of the Scorpions and Scimitars and other supporting arms. From their positions, 2 Para watched the Argentines retreating towards Stanley in the morning light and pressed Brigadier Thompson to let them advance.


                                Scots Guards moved by helicopter on the morning of Sunday 13th from their positions at Bluff Cove to the western end of Goat Ridge for a detailed reconnaissance and briefing. By now, Lt Col Scott had decided that an attack across the open southern slopes of Tumbledown would be far too hazardous, and instead opted for a "silent" assault from the west along the line of the summit ridge.
                                Preceded by a diversionary raid along the Fitzroy/Stanley track, in phase one, G Coy would take the western end of the mountain. In phase two, Left Flank (LF) Coy would pass through them before tackling the summit area. And finally, Right Flank (RF) Coy would move around LF Coy to secure the eastern end.
                                Led in from Goat Ridge by men of the M & AW Cadre, G Coy was followed to the start line by LF and RF Coys. The diversion started on schedule at 8.30 pm, and thirty minutes later, G Coy moved forward into the bitterly cold night.


                                Tumbledown Mountain

                                Battle for Tumbledown Mountain - The diversionary attack along the Stanley track went in as planned by a small assault group led by the light tanks. Reaching the enemy positions, one of the Guards and a Royal Engineer were killed in a fire-fight that lasted for two hours, and more were wounded withdrawing through a minefield, but the diversion did its job.
                                By now, in phase one, G Coy had crossed the start line with 7 Platoon and Coy HQ occupying the first half of their objective and 8 and 9 Platoons the second half. Securing the western end by 10.30 pm, the positions were used to support LF Coy who came through to face heavy fire from snipers and GPMG's.

                                In this second phase, LF Coy's 13 Platoon fought for the high crags on the left and 15 Platoon lower down on the right, while 14 Platoon followed in reserve with Coy HQ. As they pushed forward under increasing mortar and artillery bombardment, two men were killed and a third mortally wounded by snipers. Anti-armour weapons were only partially successful against the Argentine bunkers, but 13 Platoon made some progress with grenades. However, only after three hours, at 2.30 am, could artillery fire be brought down on the enemy positions in front of the stalled 15 Platoon, who with Coy HQ were now able to attack forward and up, overcoming the defences in often hand-to-hand fighting. Eventually, and after a seven hour struggle, just a few men of LF Coy reached the summit.

                                Now in phase three, RF Coy was able to come up, although the battle was far from over. With 3 Platoon giving covering fire, Number 1 and Lt Lawrence's 3 Platoon continued the assault on the eastern end, again using the MAW's and LAW's, but also moving forward in small groups taking positions with grenades and bayonets. Eventually around 8.15 am and well after dawn, Tumbledown was in the Scots Guard's hands after fighting probably the best Argentine unit, and losing eight men killed and the Royal Engineer.

                                In preparation for their attack on Mount William, The Ghurkas again helicoptered forward on Sunday 13th to a position just south of Two Sisters. As the Scots Guards battled for Tumbledown, the Gurkhas marched along the line of Goat Ridge, and just to the north of Tumbledown ready for their assault, and on the way suffered casualties from Argentine shellfire. As dawn approached and the Guards had still not secured Tumbledown, it appeared the Gurkhas would have to make a daylight assault on Mount William.


                                Argentine aircraft lost in Mount Kent area - Canberra: Late that morning, Skyhawks of FAA Grupo 5 concluded their successful war with an attack on 3 Cdo Bde HQ on Mount Kent and 2 Para on Mount Longdon, but without causing casualties, and that evening, two Grupo 2 Canberras bombed Mount Kent, and as they turned away, one was brought down by a Sea Dart from "Exeter" (or possibly "Cardiff")
                                All this time, RAF GR.3's were hitting Argentine positions around Stanley, and still on Sunday, made their first successful laser-guided bomb attacks


                                Catch-22 says they have a right to do anything we can't stop them from doing.

                                Comment

                                Working...
                                X